Tutorial for making the Crown of the Lost princess
List of materials
|
Materials Needed:
- 1 x 50mm (2in) crystal or acrylic teardrop (1) - 2 x 38 (1.5 in) crystal or acrylic teardrop (2) - 1 x 3 mm rhinestone chain (3) - Misc. Jewels (see section 5) - Cardboard - Gold Spray Paint - Masking tape - Hard Headband - Yellow craft foam - Hot glue gun - White glue Each . step (ex. 1.2) correlates to a picture (ex. section 1, picture 2) |
Estimated Difficulty:
Medium Hardest part: Patience to carefully cut with an Xacto knife, covering the edges in tape Total Completion Time: Excluding shipping time for parts and drying, 10-14 hours |
Step 1: Gather All Materials
1.1 This step includes finding all the materials, which is not as easy as you think. I ordered my jewels on Ebay to see if I could find relatively cheap. Here's the retailers I got my jewels from:
2 inch Teardrop: $3.25 (plus $1.99 in shipping) BID www.sabershores.com Set of 5 x 1.5 inch: $2.69 BUY http://stores.ebay.com/Craft-unit?_trksid=p2047675.l2563 3 mm x 1 Yard Rhinestone chain: $0.99 (plus $2.00 shipping) BID http://store.ebay.com/crystal-emporia Additional Crystals: Michaels It is possible to get all this at Michaels. Look at the pendants and look for clear, teardrop shapes. You will pay more, but you won't have to wait, or bid. IMPORTANT NOTE: Acrylic looks just as good as crystal, and usually a lot cheaper. 1.2 The headband was an old headband I had. 1.3 &4 Print out images of the crown pattern. I printed two, one from Disney website and one I found that was a lot more detailed. |
|
Step 2: Let's Get going
2.1 The first part of this step is to draw a straight line across the cardboard with the ball point pen. This is going to be the bottom of the crown. Leave some space at the bottom to allow the crown to bend down a little. The line should be about the size of your head (mine was 14 inches).
2.2 Find the center of your line, and line up the 2 inch jewel in the center. Compare your layout to the picture. The main jewel is off the headband by a round jewel. Place accordingly. Leave a little space around the jewel so it fits. 2.3 Place the other jewels according the plan. 2.4 I free handed the rest of the crown, making it look as symetrical as possible. I didn't worry about sketching because I was going to go over the whole thing anyway. 2.5 Go over all the final lines with sharpie so it's easier to cut out. |
|
Step 3: The tedious one
While I do have it all in one step-section, be warned this is the longest step of all, and the most tedious. I spent probably 6+ hours on this step. The longest part though, is optional.
3.1 Using an Xacto knife, cut out all the parts that need to be cut out. Be careful not to rip the back paper when removing the pieces. 3.2 Step 3.3 is optional, but I think it makes it look so much better. The next step is to tape all the edges because otherwise it leaves that nasty edge. 3.3 TAPING. This was the longest part of the whole process. It didn't require a lot of tape, just a lot of patience. I cut individual strips, about 1/16 of an inch ling and threaded them through all the little nooks and crannys. Overall I think it was worth the effort, both in aesthetic value and structural integrity. |
|
Step 4: Cover up
4.1 I loosely traced the crown onto the foam before I taped, though I recommend you do it after. The tape adds a little bulk.
4.2 After I loosely cut it out, I hot glued the foam to the frame. I made sure to hit the edges of the jewels, because those will be the ones with the most weight. After I got it on, I went back and hot glued where it was not glued on well. 4.3 Using an Xacto Knife (preferably with a fresh blade) cut the foam out around the frame. 4.4 Trace the frame out onto the foam again, making another copy. This will go on the back side after you glue in the jewels. Cut it out. Be sure to spray paint the right side! 4.5 Spray Paint! Be sure to do several coats, getting all edges. I recommend spray painting on a banker's box with thumb tacks to make sure it doesn't stick when you spray it. |
|
Step 5: Bring on the Bling
5.1 Lay out your crown with an image of the crown. Plan where your jewels will go.
5.2 Start with the rhinestone chain. Measure out how far you need to go halfway around the teardrop shape, making sure that the jewels are right next to each other (no space). Cut the segment off with a pair of craft scissors. 5.3 Put a strip of glue along the side. Regular white glue is fine. 5.4 Continue with this pattern around the rest of the teardrop. Continue around all three, and the curvy piece at the bottom. 5.5 I realized that I didn't have enough to cover all the parts, so I made it symmetrical by doing the end curves and the center jewels. To glue the main jewels in, flip the crown over and glue them in around the edges. Glue the back piece of foam over the back. 5.6 All the jewels on. Let the glue set for a couple hours before continuing to the next step. See a total list below. |
|
|
List of all the jewels I used:
- 1 x 2 inch teardrop acrylic center jewel - 2 x 1.5 inch teardrop acrylic side jewels - 1 yard rhinestone chain - 4 x Medium Blue Round Jewels (part of a pack #1) - 7 x Medium Pink Round Jewels (Pack #1) - 22 x Medium Round Clear Jewels (Pack #2) - 1 x Pack Small Round Clear jewels (Pack #3) |
|
Step 6: Finishing Touches
6.1 Attaching the headband: Using a hot glue gun, attach the center of the headband into the center of the crown, pressing down. Be generous with the glue. Let dry fully before doing the rest of the headband.
6.2 Glue a strip along the rest of the crown, pressing the headband down into the glue. Fill in any gaps with more glue. This will give you more contact and a better stick. Don't worry if some jewels fall off, just collect them and glue them back on at the end. 6.3 Final result It turned out really well. I am still debating gluing on bobby pins or something so it will really stay on. Hope yours turned out as good as mine did! |
|
Tutorial for making the hair pin flowers
List of Materials
Fake flowers in a variety of colors (one bud per pin)
Strait Pin (Reusable) Bobby Pin (one per flower pin) Florist Wire (I used green) |
Estimated Difficulty:
Beginner Hardest Part: Poking the strait pin through the flower bud Estimated Completion Time: 3-5 minutes |
|
Steps
This is a pretty easy project. I made 4 in under 10 minutes. Once you get the hang of it its pretty self explanatory.
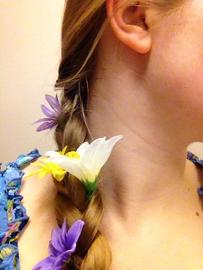
1-2: This is the florist wire I used. I bought it from Walmart for 97 cents. The second picture is everything I used in making it. Pluck the fake flower off the stem. 3: Push a straight pin through the plastic base of the bud. Wiggle it around a little bit so the hole is large enough for the wire. 4: Feed the florist wire through the hole you just created with the straight pin. Leave about 3 inches of wire on each side and cut. 5: Feed one end of the wire through the bobby pin. Wrap all excess wire around pin and stem, making sure the flower stays close and upright to the bobby pin. All done! 6: This is me with a simple braid with a couple of the flower pins in. |
|
